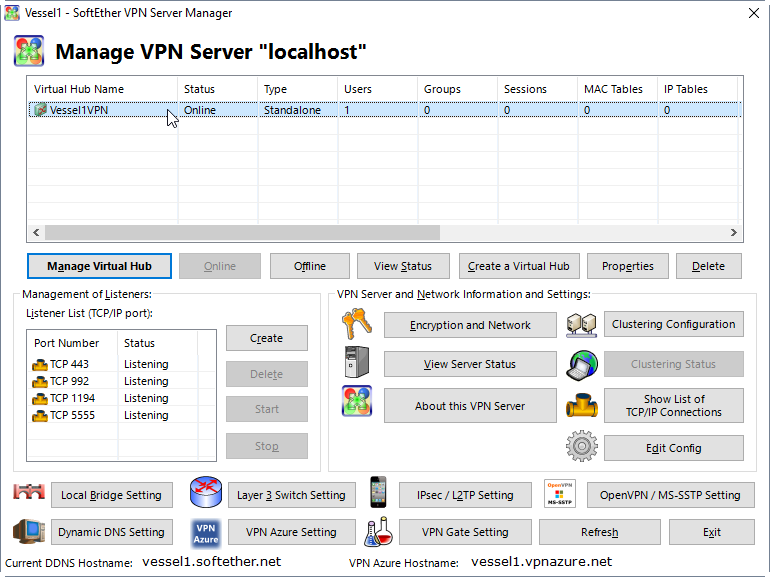
We can close the user creation dialogue and we can now finish server setup.
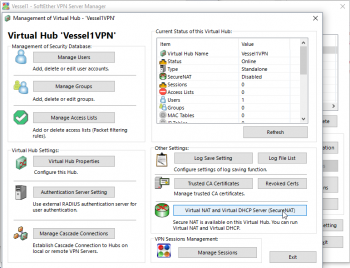
Click two times on the HUB to go to management options.
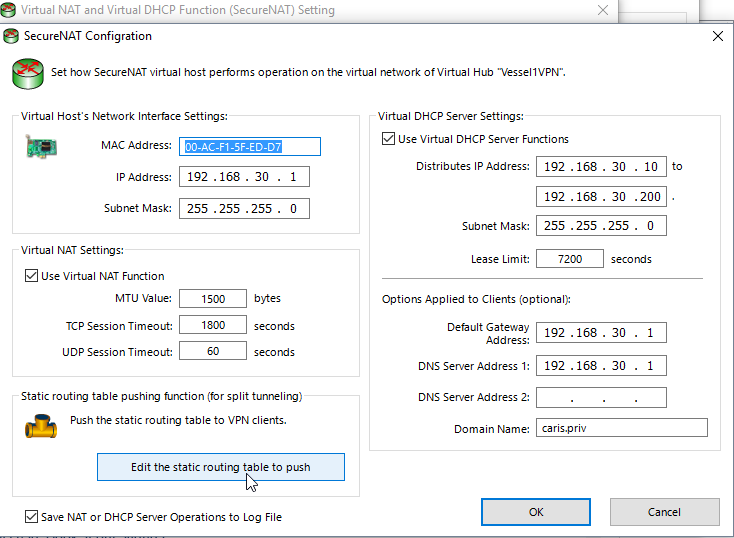
We are going to create a NAT server with DHCP – so when you connect to the server you would get IP address and through NAT you would have access to internal network. Keep in mind that basic settings would redirect whole Internet traffic through your mobile gateway. If you want to change this – you can modify routing settings. But for standard usage what we would set here should work as expected.
Setting up NAT and DHCP
Just be sure all settings are there and activate DHCP server and Virtual NAT – you can eventually change MTU to smaller value – 1500 bytes would work fine in most cases – but for 4G/3G networks I would think to limit that value a little. We should have the SecureNAT active.
We can exit – the server is ready!!! That was the very difficult part.
Hydrographer Category A, Navigator and as well IT specialist - managing multiple servers in the data centres.
He is the author of most of the articles on this page. And he is not responsible for any use of proposed solutions - so pleas check always if this is is a good idea to follow proposed solutions.
He is open for new technologies in IT, home automation, renewable energy and as well is following all changes in car industry. He loves electric cars as the most efficient way of transportation.
This website uses cookies to improve your experience. We'll assume you're ok with this, but you can opt-out if you wish.AcceptRead More
Privacy & Cookies Policy
Privacy Overview
This website uses cookies to improve your experience while you navigate through the website. Out of these, the cookies that are categorized as necessary are stored on your browser as they are essential for the working of basic functionalities of the website. We also use third-party cookies that help us analyze and understand how you use this website. These cookies will be stored in your browser only with your consent. You also have the option to opt-out of these cookies. But opting out of some of these cookies may affect your browsing experience.
Necessary cookies are absolutely essential for the website to function properly. This category only includes cookies that ensures basic functionalities and security features of the website. These cookies do not store any personal information.
Any cookies that may not be particularly necessary for the website to function and is used specifically to collect user personal data via analytics, ads, other embedded contents are termed as non-necessary cookies. It is mandatory to procure user consent prior to running these cookies on your website.


